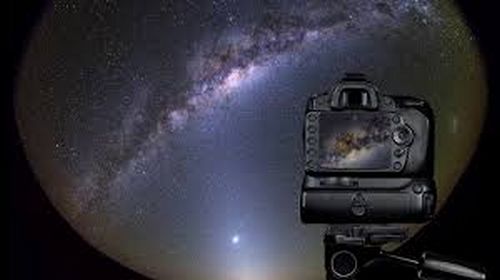
So you’ve got a DSLR in your hands, you look up at the night sky, and you think, “I really want to capture this moment.” You’re not alone—many beginners wonder how do I set up a DSLR to take photos of the stars, and at first, it can feel a bit overwhelming. The good news? It’s actually far simpler than it seems.
You don’t need to be a professional astronomer or spend a fortune on fancy gear. With the right camera settings, a sturdy tripod, and a little patience, your DSLR can capture far more light than your eyes can perceive. That’s exactly how those breathtaking Milky Way shots happen.
In this guide, I’ll break down the essentials—what equipment you truly need, which settings work best, and some practical tips to make sure your star photos come out sharp and stunning.
Why Shoot Stars With a DSLR?
So, why go through the trouble of photographing stars with a DSLR when your phone can take pictures too? The answer is simple—DSLRs give you far more control. You can adjust settings like shutter speed, aperture, and ISO, which makes a huge difference when capturing faint starlight. On top of that, larger sensors mean less noise in low-light conditions. Here are a few key perks:
-
Higher image quality in dark conditions
-
Flexibility to swap and use different lenses
-
Ability to shoot in RAW for more detailed editing
-
Long exposure shots without everything turning into a blur
That’s exactly why a DSLR is the preferred choice for star photography.
Advantages of Using a DSLR for Astrophotography:
Wondering why a DSLR is worth it for night sky shots? It all comes down to control. With a DSLR, you can manually fine-tune shutter speed, aperture, and ISO to get the exact shot you want. Smartphones are handy for quick snaps, but when aiming for the Milky Way or a sky full of stars, you need that kind of precision. Plus, DSLRs outperform phones in low-light conditions, giving you clearer, sharper images.
What Makes Star Photography Different From Regular Photography
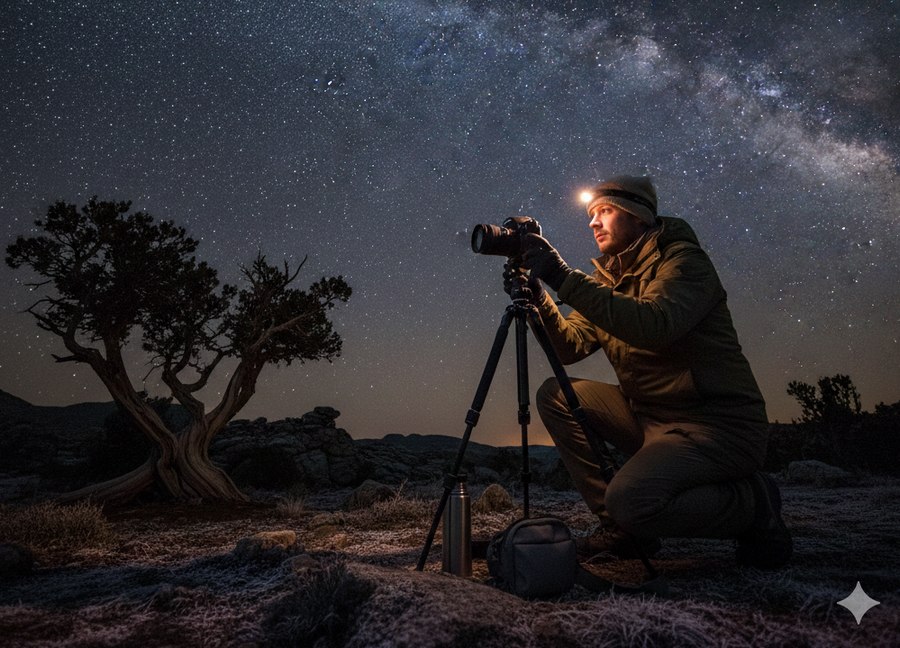
Taking star photos is a completely different challenge than snapping a quick shot of your dog or a sunset. For starters, you’re shooting in near-total darkness. You’ll need longer exposures to gather enough light, and even the slightest camera movement can spoil your shot. Unlike daytime photography, autofocus won’t get the job done—you’ll need to focus manually. In short, patience and practice are key ingredients.
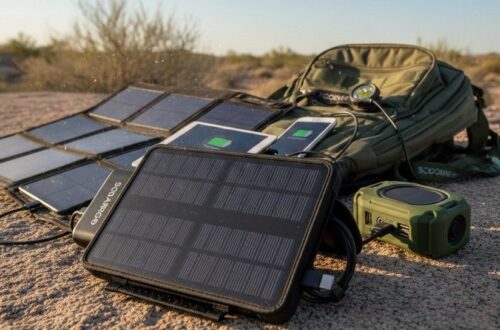
Essential Gear You’ll Need
When people ask, “how do I set up a DSLR to photograph stars?” my first advice is always: make sure your gear is right. You don’t need to carry around a ton of equipment, but a few essentials make a huge difference:
-
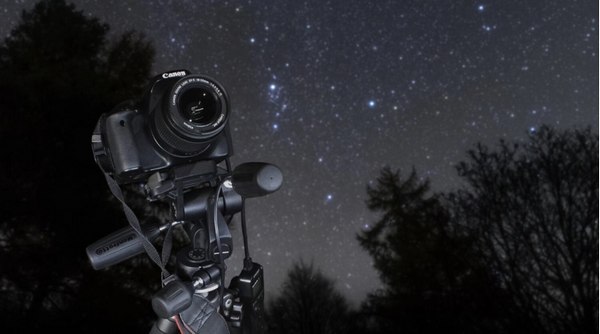
DSLR Camera and Compatible Lens – A wide-angle lens with a fast aperture (f/2.8 or lower) is ideal for night sky photography.
-
Tripod for Stability – Long exposures mean shaky hands are your biggest enemy. A solid, sturdy tripod is essential.
-
Remote Shutter Release or Intervalometer – This helps you avoid touching the camera and introducing blur, and lets you shoot multiple frames automatically.
DSLR Camera and Compatible Lens
First things first—you need a DSLR. It doesn’t matter if it’s an entry-level model or a high-end body; the important part is being able to shoot in full manual mode.
Pair it with a wide-angle lens—something between 14mm and 24mm works perfectly because it captures a larger portion of the sky. Look for a lens with a fast aperture (f/2.8 or lower) to let in as much light as possible—after all, that’s what star photography is all about.
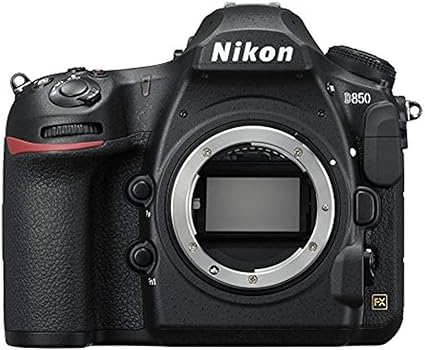
Specifications:
- Sensor: Full-frame CMOS
- Megapixels: 45.4MP
- Autofocus: 153-point AF, 99 cross-type
- Screen type: 3.2-inch tilt-angle touchscreen, 2,359,000 dots
- Maximum continuous shooting speed: 7fps
- Movies: 4K
- Battery life: 1,840 shots
- User level: Expert
Tripod for Stability
- Without a tripod, you’re doomed. Seriously. Even the steadiest hands can’t hold a camera still for 15–30 seconds.
- A sturdy tripod means sharper stars and less frustration. Wobbly, cheap ones just make you hate life at 2 AM.
- Bonus tip: hang your backpack from the tripod hook to keep it even steadier if it’s windy.
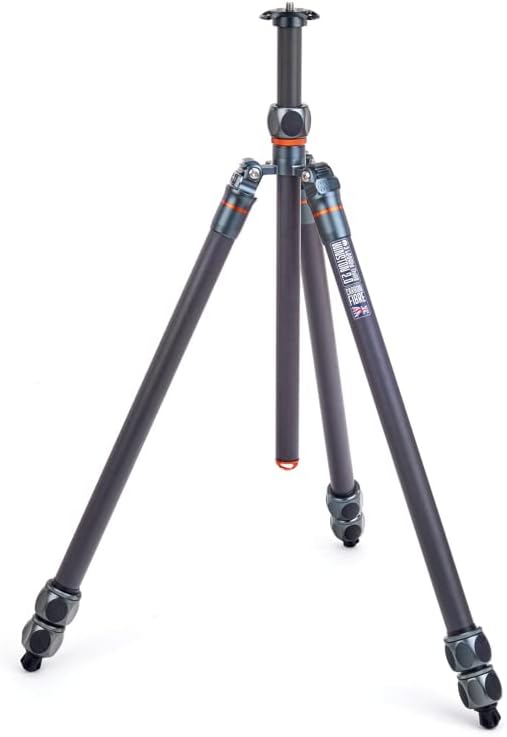
Specifications
- Material: Carbon fiber
- Extended height: 194cm
- Folded height: 61.2cm
- Weight: 2.05kg
- Leg sections: 3
- Max load (legs, head): 40kg, 30kg
Remote Shutter Release or Intervalometer
- Pressing the shutter button by hand will shake the camera. Not good when you’re chasing stars.
- A remote shutter (even the cheap wired ones) fixes this.
- Want to get fancy? Grab an intervalometer. It not only avoids shake but also lets you take multiple long exposures, perfect for star trails.
1. Canon BR-E1
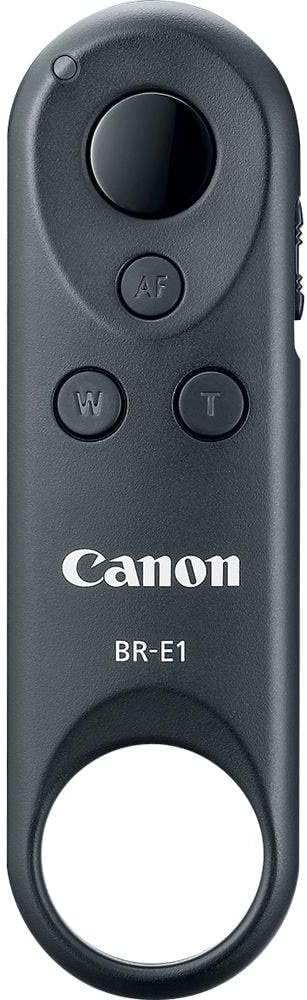
Specifications
- Compatibility: Canon EOS R1, R3, R5 Mark II, R5, R6 Mark II, R6, R7, R8, R10, R50, R50 V, R100, Ra, R, RP, EOS M6 Mark II, M50 Mark II, M50, M200, EOS 6D Mark II, 90D, 77D, Rebel T7i, Rebel SL2 (200D), Rebel SL3 (250D), 850D, 800D, 2000D, PowerShot V1, V10, G5 X Mark II, G7 X Mark III, SX70 HS
- Wired/wireless: wireless
- Wireless range: 16ft / 5m
Key Takeaways
There’s a lot of info to digest here, but these are the main points to keep in mind:
-
Starting with a DSLR and a wide-angle, fast lens is the easiest way to begin star photography.
-
A tripod is essential to keep your camera steady during long exposures.
-
Shooting in manual mode is a must—set your aperture wide (f/2.8–f/4), ISO around 1600–3200, and shutter speed between 15–25 seconds.
-
Apply the 500 rule to prevent unwanted star trails.
-
Manual focus on a bright star or distant light works far better than relying on autofocus at night.
-
Capture images in RAW format for maximum flexibility in post-processing.
-
Patience pays off—expect to take lots of test shots before getting the perfect image.
-
Start with simple compositions, then explore advanced techniques like star trails, Milky Way shots, or using a star tracker.
-
Shooting in dark-sky locations makes a huge difference—light pollution is your biggest challenge.
-
Enjoy the journey: astrophotography is about the experience beneath the stars as much as the final photo.
Step-by-Step: How to Set Up Your DSLR for Star Photography
Now let’s get practical—how do you actually set up your DSLR for star shots? Don’t worry, it’s simpler than it sounds. The key is controlling light, keeping your camera steady, and learning a few handy tricks.
Start by finding a dark location, far from streetlights or city glow. Switch your DSLR to manual mode. Mount your wide-angle lens, open the aperture low, boost your ISO, and choose a shutter speed that’s long enough to capture starlight but short enough to prevent trails. And don’t forget manual focus—it’s the most reliable way to get sharp stars at night.
Step 1: Find a Dark Sky Location
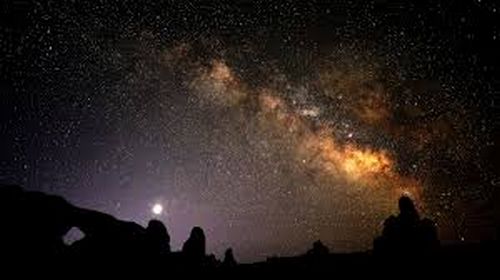
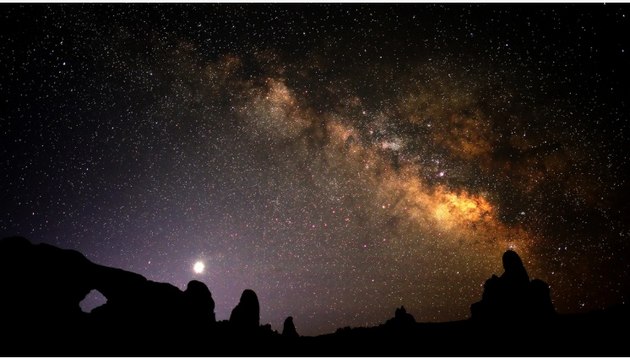
Alright, first things first—if you want those stunning star shots, you need true darkness. Real, pitch-black conditions. Cities are perfect for coffee shops and nightlife, but not for capturing the stars. Streetlights, neon signs, and even a bright moon can wash out the Milky Way faster than you can say “long exposure.”
So, how can you find a genuinely dark sky? Here are some tips:
-
Use dark sky maps – Websites and apps like Dark Sky Finder or Clear Outside can help you locate areas with minimal light pollution.
-
Head rural or remote – The farther you are from city lights, the better your photos. Mountains, lakesides, and national parks often offer ideal conditions.
-
Check the moon phase – Aim for a new moon; a full moon can be bright enough to ruin most star shots.
-
Scout during the day – Make sure the location is safe and accessible—you don’t want to show up at night only to find it’s private property or tricky terrain.
Once you’re in a dark sky spot, the stars will practically pop out of the night, and all the preparation for shooting with your DSLR suddenly feels completely worth it.
Step 2: Choose the Right Lens (Wide-Angle, Fast Aperture)
Next on the list: your lens. Not every lens can do justice to your night sky shots. To truly capture the stars, you’ll want something wide and fast.
-
Wide-angle lens – For full-frame cameras, aim for 14mm to 24mm; for crop sensors, 10mm to 18mm works great. Wide lenses allow you to capture more of the sky and even include interesting foregrounds, like mountains, trees, or lakes. This adds depth and makes your photos much more engaging.
-
Fast aperture – Look for f/2.8 or faster if possible. The wider your lens aperture, the more light you can gather, which is essential for night photography. A slower lens means cranking up your ISO, which can introduce unwanted noise.
-
Skip zoom lenses for deep-sky shots – While telephoto lenses can be fun for creative shots, beginners will find wide-angle lenses far easier to handle. They capture sweeping vistas of the sky and are more forgiving when it comes to small movements.
In short, if your question is, “how do I set up a DSLR to photograph stars?” starting with a wide, fast lens puts you well on your way to stunning night sky shots.
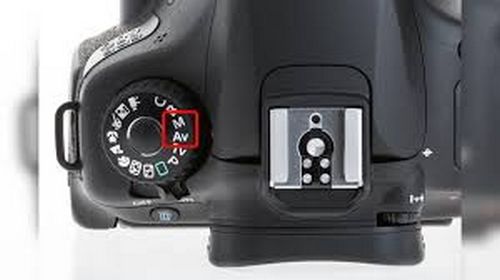
Step 3: Set Your Camera to Manual Mode
Embracing Manual Mode
This is the part that intimidates a lot of beginners—manual mode. But honestly, if you want full control over your star photography, it’s a must. Auto modes simply won’t work at night; your camera tends to underexpose because the scene is so dark.
-
Switch to Manual (M) mode – This gives you independent control over shutter speed, aperture, and ISO.
-
Use manual focus – Autofocus often struggles in low light. Choose a bright star or a distant light and focus on that.
-
Shoot in RAW – RAW files offer much more flexibility in editing. You can tweak exposure, white balance, and shadows without degrading image quality.
-
Turn off auto features – Disable things like auto ISO, auto white balance, and vibration reduction when your camera is mounted on a tripod.
Once your DSLR is set to manual mode, you start to feel like you’re actually “painting with light.” It’s surprisingly empowering and opens up a whole new world of creative possibilities.
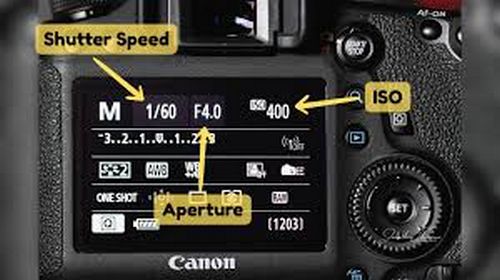
Step 4: Adjust Aperture, Shutter Speed, and ISO
Dialing in Your Settings
Now comes the fun part—fine-tuning your camera settings. This is where beginners often feel overwhelmed, but it’s really simpler than it seems.
-
Aperture – Open your lens as wide as it goes (f/2.8 or faster). A wide aperture lets in more light, which is essential for capturing those faint stars.
-
Shutter speed – Use the 500 rule: divide 500 by your lens’s focal length. For example, with a 20mm lens: 500 ÷ 20 = 25 seconds. This means you can expose for up to 25 seconds before star trails appear. If you’re using a crop sensor camera, multiply the focal length by your crop factor first.
-
ISO – Start with 1600–3200. Increasing ISO makes the sensor more sensitive to light, but it also introduces noise. You’ll need to experiment to find the sweet spot for your camera. Modern DSLRs can even handle ISO 6400 or 12800 surprisingly well.
Quick Tips While Adjusting
-
Take a test shot, then zoom in on your camera’s LCD to check focus and star brightness.
-
Tweak ISO or shutter speed if the stars appear too dim or if trails are too long.
-
Patience is essential—you’ll likely adjust these settings several times before getting a shot you love.
By the time you’ve experimented with aperture, shutter speed, and ISO, you’ll have a solid understanding of how to set up a DSLR for star photography. It’s all about trial and error, learning how light behaves, and seeing how your camera responds to the night sky. And when you finally nail it, there’s nothing quite like capturing the Milky Way in all its breathtaking glory.
Step 5: Focus Manually on a Bright Star
Focusing Your DSLR on the Stars
Getting your DSLR to focus on stars can feel intimidating at first. Autofocus usually struggles in low light, so manual focus is the way to go. Here’s a simple approach:
-
Switch your lens to manual focus mode.
-
Use live view and zoom in on a bright star or a distant light.
-
Slowly rotate the focus ring until the star appears as a sharp, crisp point.
Take your time—even a small focus error can ruin the shot, especially if you’re trying to capture detailed Milky Way images.
Pro tip: For wide-angle shots, try using the hyperfocal distance. It may sound technical, but it basically ensures both your foreground and the stars remain in focus. Once you’ve set it, lock your focus and avoid touching the lens—cold night temperatures can sometimes cause the lens to shift slightly.
Step 6: Use the 500 Rule to Avoid Star Trails
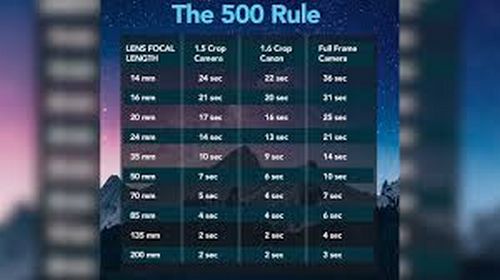
The 500 Rule: Avoid Streaky Stars
If you want pin-sharp stars without trails, the 500 Rule is your best friend. It’s straightforward:
500 ÷ focal length = maximum shutter speed in seconds
For instance, with a 24mm lens: 500 ÷ 24 ≈ 20 seconds. Any exposure longer than that, and your stars will start to streak.
Extra tips:
-
Ultra-wide lenses can often handle a slightly longer exposure.
-
If you’re using a star tracker, you can ignore the 500 Rule—the tracker moves with the stars.
-
Always check your first few shots carefully for any tiny trails.
Mastering the 500 Rule is one of the first steps in figuring out how to set up a DSLR for star photography. It’s a small calculation, but it can save you from hours of blurry images.
Step 7: Shoot in RAW Format for Better Editing
Why Shoot in RAW
JPEGs are convenient, no doubt, but when it comes to night sky photography, RAW is the way to go. Here’s why:
-
RAW files retain all the data your DSLR captures.
-
They give you far more flexibility for adjusting exposure, contrast, and color balance.
-
Slightly under- or overexposed shots can be rescued in post-processing without degrading image quality.
Think about it—your first star photos might turn out too dark, or the Milky Way may not pop the way you hoped. Shooting in RAW lets you fix these issues in editing. You’ll need software like Lightroom, Capture One, or Photoshop, but the results are worth it.
Keep in mind: RAW files are much larger than JPEGs, so bring extra memory cards. Shooting in RAW is one of those small but essential steps in mastering how to set up a DSLR for star photography—it can turn a so-so picture into a frame-worthy shot.
Step 8: Take Multiple Test Shots and Adjust Settings
Trial and Error: The Reality of Astrophotography
Astrophotography is all about experimentation. Even after you’ve set up your dslr or mirrorless camera perfectly, your first shot might not be flawless. It is vital to take some test shots to dial in your settings.
Start with your initial guesses for aperture, shutter speed, and ISO.
-
Snap a test shot and review it—are the stars sharp? Is the foreground too dark or too bright?
-
Adjust one setting at a time so you can see exactly how each change affects the image of the stars.
-
Try bracketing: take several shots at slightly different exposures. Later, you can pick the best or even stack them for more detail.
Some nights, you’ll tweak settings a lot—that’s completely normal. Experimenting teaches you how your DSLR reacts to darkness, cold weather, and different lenses. The more you practice, the quicker you’ll master the settings for photographing the night sky like a pro.
Pro Tips for Better Star Photos
Once you’ve got the basics down, these extra tips can really elevate your images of the night sky. No need for fancy equipment—just patience and small adjustments.
1. Reduce Light Pollution
City lights can wash out stars completely. When you are away from city lights, you can see lots of stars that are invisible to the naked eye. Use apps like Photopills, Light Pollution Map, or Stellarium to find darker areas nearby. If you’re stuck in a brighter spot, a light pollution filter can help bring out the Milky Way.
2. Keep Your Gear Warm and Batteries Charged
Cold nights drain batteries quickly, so pack spares and keep them warm in your jacket. Lens fog can also ruin a shoot—bring a microfiber cloth or even a hand warmer to keep your camera lens clear.
3. Experiment with Star Trails and the Milky Way
Once you’re comfortable, try variations like photographing star trails—leave your shutter open longer or stack multiple long-exposure images in post-processing. To see star trails clearly, you will need a sturdy setup. Framing the Milky Way in a dark location with foreground objects like trees or rocks adds dramatic interest to this type of photography.
4. Post-Processing Tips
Shooting is only half the fun—the magic often happens in editing. RAW files let you recover details in exposure, contrast, and highlights. You might use Photoshop to make the Milky Way stand out more. Apply mild noise reduction if your high iso was used. The goal: make stars pop while keeping the scene natural.
Common Mistakes to Avoid
Even seasoned photographers make simple mistakes when photographing the stars. Here are three big ones:
-
Using Auto Focus or Auto Mode – Autofocus fails in low light. Stick to manual mode, use your maximum aperture, and manually focus on the stars.
-
Long Shutter Speeds Without a Tripod – Even tiny shakes blur stars. Always use a sturdy tripod; if you don’t have one, it’s hard to use to take a clear 30-second shot.
-
Forgetting to Turn Off Image Stabilization – On a tripod, stabilization can actually create blur. Turn it off to get crisp stars across the sky.
Final Thoughts
After all the gear prep, settings to use, and trial-and-error nights, it really comes down to patience and practice. Star photography isn’t about the most expensive equipment—it’s about learning, experimenting, and enjoying the stars in the night sky.
Key takeaways:
-
Don’t stress over initial blurry shots—they’re part of the learning process.
-
Use a remote or a timer to avoid shaking the camera.
-
Each clear night is different; expect different results every time.
Why Patience Matters
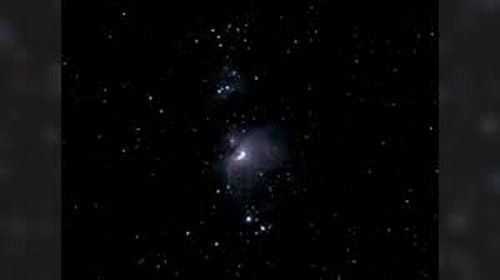
Stars don’t work on your schedule. Waiting for the right night, weather, and season is part of the process. Photographing the night sky requires trial and error—you might take 50 shots and only like a few. But the way to achieve a great shot is worth it: capturing Orion’s Belt or the Milky Way in all its glory is unforgettable.
Start Simple, Then Experiment
Begin with a wide-angle lens, 24mm or 35mm, and a 20-second exposure. An iso 1600 setting is usually enough to start. Depending on the lens you are using, you will want to focus the lens to infinity.
Don’t overcomplicate things—no need for star trackers on day one. Once comfortable, try a long-exposure shot of 30 seconds. If there’s a full moon, you might even capture the moon at night as a focal point. Gradually move from basic photographing the stars to capturing galaxies and nebulae.
FAQ – DSLR Setup for Star Photography
Q: What camera settings should I use? A: Manual mode, wide aperture (f/2.8 or lower), iso 3200, and a shutter speed of 15–25 seconds. Experiment with different settings if you are using an aps-c camera.
Q: Do I need an expensive lens? A: Not at all. A mirrorless camera or DSLR with a wide-angle, fast lens is the ideal camera setup, but even a basic kit lens can produce great images at night.
Q: How do I focus on stars at night? A: Switch to manual focus, aim at a bright star, and focus the lens until it’s sharp. Using live view zoom helps you focus on the stars accurately.
Q: Can I shoot stars in a city? A: You can, but light pollution limits what you’ll capture with the naked eye. To see lots of stars, you need a dark site. If stuck in the city, focus on the Moon or bright planets.
Q: What is the 500 Rule? A: Divide 500 by your lens’s focal length to find the max shutter speed before stars will begin to trail and leave your field of view. For example, 500 ÷ 20mm = 25 seconds.